IzPack Installer - Hello World Tutorial
This tutorial provides a step by step creation of an IzPack Installer.
Object
Create an IzPack Installer using following tools: IzPack, Ant, Bash for GNU/Linux and Microsoft Windows 7.
IzPack on GNU/Linux
Step 1. - Assumptions
- A Debian based GNU/Linux Distribution (recommended: Xubutu)
- Oracle JDK (used in tutorial: Java SE Development Kit 7u21)
- Eclipse ( Use this instructions for installation)
- Apache Ant
- IzPack Library (Download the installer for IzPack 4.3.5)
Step 2. - Preparation
- Start Eclipse and create a new Java Project in it.
- File -> New -> Java Project.
- Name your project (for example: HelloWorldInstaller).
- JRE Settings in Eclipse should be intakt.
Step 3. - Create A Swing Based Application
- Make sure you're in your new created project folder.
- Go to the source folder (src).
- Create a Java Class (name used in tutorial: HelloWorld).
- Paste the source code block down below to your new created class. This source code is a simple swing based dialog with a PushButton.
- Compile and run it.
import java.awt.event.ActionEvent;
import java.awt.event.ActionListener;

import javax.swing.JButton;
import javax.swing.JFrame;
import javax.swing.JPanel;
import javax.swing.SwingUtilities;

public class HelloWorld extends JFrame {

    public HelloWorld() {
        initUI();
    }

    public final void initUI() {

       JPanel panel = new JPanel();
       getContentPane().add(panel);

       panel.setLayout(null);

       JButton quitButton = new JButton("Hello World");
       quitButton.setBounds(50, 60, 120, 30);
       quitButton.addActionListener(new ActionListener() {
           public void actionPerformed(ActionEvent event) {
               System.exit(0);
          }
       });

       panel.add(quitButton);

       setTitle("Hello World");
       setSize(300, 200);
       setLocationRelativeTo(null);
       setDefaultCloseOperation(EXIT_ON_CLOSE);
    }

    public static void main(String[] args) {
        SwingUtilities.invokeLater(new Runnable() {
            public void run() {
                HelloWorld ex = new HelloWorld();
                ex.setVisible(true);
            }
        });
    }
}
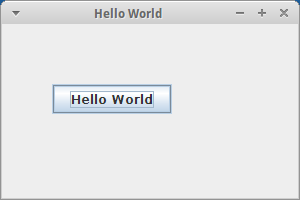
This dialog should popup on the screen:
Step 4. - Create An Ant Script
- Highlight your project folder and execute the shortkey CTRL+N.
- Go to XML folder and choose XML File.
- Name this XML File (build.xml)
- Paste the xml code down below to build.xml
<?xml version="1.0"?>
<project name="HelloWorld" default="build" basedir=".">

  <property name="src.dir" location="src" />
  <property name="build.dir" location="bin" />

  <target name="clean">
    <delete dir="${build.dir}" />
  </target>

  <target name="makedir">
    <mkdir dir="${build.dir}" />
  </target>

  <target name="build" depends="clean, makedir">
    <javac srcdir="${src.dir}" destdir="${build.dir}"/>
  </target>

</project>
This build.xml is a standard build ant script. Right now it consists of two properties (src.dir, build.dir) and three targets (clean, makedir, build). For the future steps import this ant script to your Ant View in Eclipse.
Step 5. - Import IzPack
In this step the recently downloaded IzPack 4.3.5 Jar File will be imported to the project.
- Run the IzPack jar file (java -jar /path/to/IzPack/Jar)
- Follow the installation instructions. Remember the directory where the IzPack Installer Framework has been installed (installation path used in tutorial: /home/user/Desktop/IzPack).
- Create two directories. The first directory for the IzPack setting file for the creational process and the second directory for the generated installer (used in tutorial: /home/user/Desktop/Files4Installer and /home/user/Desktop/HelloWorld).
TODO: Information about the folder structure of the IzPack Installer Framework
To use the IzPack Framework in the HelloWorld project follow next instructions.
Create two more properties in the build.xml. Use the following xml code and import this right after the existing two properties.
<property name="install.file" location="/home/user/Desktop/Files4Installer/install.xml" />
<property name="image.dir" location="/home/user/Desktop/Files4Installer/images" />
In the Files4Installer directory create an xml file (name of the file has to be: install.xml) and a directory named images. In this directory you should put the images used by IzPack for the Istaller. In this tutorial two images were used. Download these two images here (Image 1, Image 2) and name it helloworld_image1.png and helloworld_image2.png or create your own and put them into the images derectory. If you create your own images the size for the image 1 and image 2 should be 500x200 and 125x400 pixels, respectively.
Put the following content into the install.xml in Files4Installer
<?xml version="1.0" encoding="iso-8859-1" standalone="yes" ?>

<installation version="1.0">
    <info>
        <appname>Hello World Application</appname>
        <appversion>1.0</appversion>
        <authors>
            <author name="Your Givenname and Lastname" email="givenname.lastname@hello-world.org"/>
        </authors>
        <url>http://www.hello-world.de/</url>
    </info>

    <guiprefs width="640" height="480" resizable="yes"/>

   <locale>
        <langpack iso3="eng"/>
        <langpack iso3="deu"/>
   </locale>

   <resources>
		<res id="installer.langsel.img" src="images/helloworld_image1.png" />
		<res id="Installer.image" src="images/helloworld_image2.png" />
	    <res id="LicencePanel.licence" src="Licence.txt"/>
	    <res id="InfoPanel.info" src="Readme.txt"/>
   </resources>

   <panels>
        <panel classname="HelloPanel"/>
        <panel classname="InfoPanel"/>
        <panel classname="LicencePanel"/>
        <panel classname="TargetPanel"/>
        <panel classname="PacksPanel"/>
        <panel classname="InstallPanel"/>
        <panel classname="FinishPanel"/>
   </panels>

   <packs>
		<pack name="HelloWorld" required="yes">
			<description>Hello World Application Runnables</description>
			<file src="/home/user/workspace/HelloWorldInstaller/bin/HelloWorld.class" targetdir="$INSTALL_PATH"/>
			<file src="/home/user/workspace/HelloWorldInstaller/bin/HelloWorld$1.class" targetdir="$INSTALL_PATH"/>
			<file src="/home/user/workspace/HelloWorldInstaller/bin/HelloWorld$2.class" targetdir="$INSTALL_PATH"/>
		</pack>
   </packs>

</installation>
Common mistakes:
- verify username in the path
- verify the path to the directory
Next lines of xml code are the hearth of the creation of an installer with aid of IzPack Framework. Paste the xml code down below in the build.xml right after the build target.
<taskdef name="mkinstaller"
	classpath="/home/user/Desktop/IzPack/lib/standalone-compiler.jar"
	classname="com.izforge.izpack.ant.IzPackTask"/>

<target name="mk_installer" depends="build">
	<mkinstaller input="${install.file}"
		output="/home/user/Desktop/HelloWorld/HelloWorld_installer.jar"
		basedir="/home/user/Desktop/Files4Installer/"/>
</target>
Common mistakes:
- verify username in the path
- verify the path to the directory
Create two files in this directory /home/user/Desktop/Files4Installer.
- Licence.txt
- Readme.txt
These files can be empty for now or you put some content in it for better understanding.
Step 6. - Hello World
If you reached this section and done all the pastings and installations in the right order then right now you can build your first installer containing the compiled source code of the HelloWorld application. In the Ant View of Eclipse you can find the new created target named mk_installer and by executing it the following steps should be done one by one: source code compilation -> taking compiled source code and creating an installer by using a defined directory (used in tutorial: /home/user/Desktop/Files4Installer) -> placing the created jar file in a specified directory (used in tutorial: /home/user/Desktop/HelloWorld).
IzPack on Microsoft Windows 7 (TODO)